How Do I...? A M.U.G.E.N primer

Tutorial Part 2 - Collision boxes

M.U.G.E.N, Elecbyte (c)2001
Updated 30 April 2001


Tutorial 1 | 2 | 3 | 4

Introduction

In this part, we will talk about how to define collision boxes for the animations in your character's .air file. The documentation for .air files is in air.txt. It's a good idea to read it before proceeding with this tutorial.


1. About Collision Boxes

Once you have put together an animation for the character, you can use AirEditor to define collision boxes. There are two kinds of collision boxes:

Simply put, if one of Player 1's attack boxes overlaps any one of Player 2's hit boxes, then it means Player 1 has hit Player 2.


2. Using AirEditor

AirEditor is a tool included in our developer's toolset, which lets you define collision boxes. Extract all the files from the tools archive into your M.U.G.E.N directory. The instructions for using AirEditor are in airedit.txt. When you are ready, run airedit.exe.

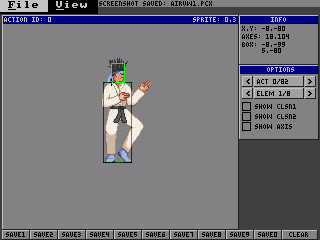
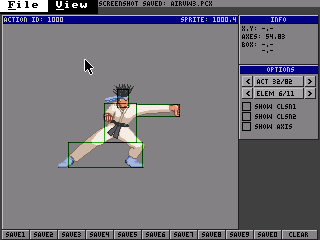
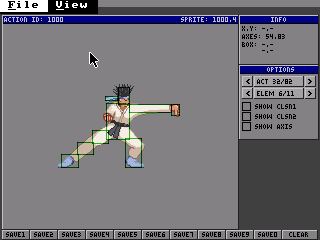
Go to File -> Open and choose the sff file you want to load, followed by the accompanying air file. You will now see your character on the screen:
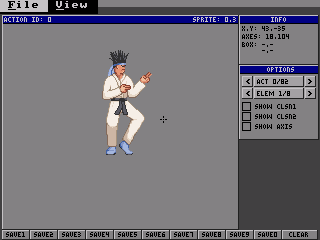
AirEditor screen

Let's explain what you see on the screen.

To define a collision box, simply drag the mouse cursor over the region you want to create a box at. This will be displayed as a bright green box. Click without dragging to make the green box go away. Let's start by defining boxes for KFM's standing frame. First, we'll drag a box to represent his body.
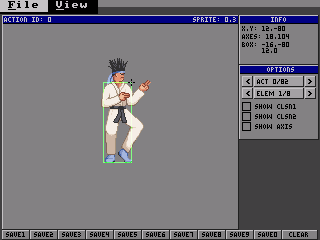
Boxes1 Boxes2

Click on the Save1 button at the bottom of the screen to save that box to memory. Now drag a second box for the head and click on Save2 to save that. Notice how the saved boxes appear in a darker color. If you want to go back and correct one of the saved boxes, simply drag a new green box

Now, to save this set of boxes to the .air file, click on the File menu and choose Save. Now choose either Clsn1 or Clsn2 to save that set of boxes accordingly. Repeat this process until you have all the boxes defined for each element of the animation.


3. General Tips


Tutorial 1 | 2 | 3 | 4

Next is Tutorial Part 3
e palette to work with. On the other hand, pre-rendered sprites may look better with a larger range of colors, at the cost of little extra work. Keep these points in mind when designing your character's palette.

For Paint Shop Pro users

In PSP5, go to colors->decrease color depth->8bit (256). Choose Optimized Octree and Nearest color for reduction method. You might try to test some other options to see what works best. Now, edit the palette (colors->edit palette) and swap the color in color 0 (upper left) with the your BG color. Finally, save that palette and run it through pal2act.exe tool included with the PcxClean package in our general tools section. Now you can choose to run your sprites through PcxClean with your new palette, or convert the remaining images to the same palette manually.


2. How do I start making a character?

Go to the chars/ directory and make a new directory for your character. Let's call this character "Player", for an example (replace "player" with whatever you want to call your character). In this case, make a directory called chars/player. Put the sprmaker and the other MUGEN tools in the same directory as mugen.exe.


3. What does this character need?

You'll need to have these in the chars/player directory:

player.air
player.cmd
player.cns
player.def
player.sff
player.snd
player.act

To see what each of these files are, read overview.txt included in the docs/ directory of the M.U.G.E.N zip file.
In this tutorial, you’ll make player.sff, the sprite file.

4. How do I start making these files?

You can make them all from scratch... Or, you can start by using our example character Kung Fu Man. You can also obtain KFM's work files from the developer's section of our MUGEN website. Extract KFM's work files into a directory called work/kfm/ under your MUGEN directory.

5. OK, I got KFM. Now what?

The first thing to do is to copy over and rename the files needed for your character. Assuming your player's directory name is "player", these are the files you should copy:

chars/kfm/kfm.air -> chars/player/player.air
chars/kfm/kfm.cns -> chars/player/player.cns
chars/kfm/kfm.cmd -> chars/player/player.cmd
chars/kfm/kfm.def -> chars/player/player.def
What are these files? These 4 files are all in text format, which you can edit in a text editor such as MS-DOS EDIT or Windows WordPad. Here is a list of each of these files, what they do, and their corresponding technical documentation files. To set up your character's basic information, open player.def using a text editor. Change the fields to the appropriate values. For example:

; Player information
[Info]
name = "Player"             ;Name of character
displayname = "My Player"   ;Name of character to display
versiondate = 04,14,2001    ;Version date of character
mugenversion = 04,14,2001   ;Version of M.U.G.E.N character works on
author = "Yourname"         ;Character author name
pal.defaults = 1            ;Default palettes in order of preference

; Files for the player
[Files]
cmd     = player.cmd   ;Command set
cns     = player.cns   ;Constants
st      = player.cns   ;States
stcommon = common1.cns ;Common states
sprite  = player.sff   ;Sprite
anim    = player.air   ;Animation
sound   =              ;Sound (leave blank if none) *** Set to blank for now ***
pal1    = player.act   ;Palettes (can have up to 12)
;*** delete lines with palettes you are not using ***

; Arcade mode
[Arcade]
intro.storyboard =     ;*** Set to blank for now ***
ending.storyboard =    ;*** Set to blank for now ***

Making the sprite file

Now let's make player.sff, the character's sprite file. We'll concentrate on just making standing animation for now. If you already have the sprites you want to use, get those ready. Let's say that the standing animations you want to use are named stand00.pcx – stand03.pcx and are in the work/player/ directory. Now, make a text file inside work/player/ and call that file player.txt (of course you can name it anything you want). Here's the start of the text file you would use (comment lines begin with a semicolon).


;Options (don't worry about the following 3 lines for now)
#
1
2
;Next is the filename. This is where sprmaker will make the file.
chars/player/player.sff
;----------------
;your sprite file name
work/player/stand00.pcx   
;The next two are the group and image number.
;You'll use these numbers in the .air file.
0			
0			
;X and Y axis,  you'll have to change these numbers
;for your own sprites
17			
105
work/player/stand01.pcx
0
1
17
105
work/player/stand02.pcx
0
2
17
105
work/player/stand03.pcx
0
3
17
105
; end of file

For details on how sprmaker works, check the mtools.txt file that comes with the MUGEN tools. You might want to read it now before proceeding with this tutorial.

The group number and image number you enter for each sprite is used to access it in the .air (animation) file. It's just a pair of numbers you will associate with the sprite. For example, instead of referring to stand02.pcx, you will refer to 0,2.

Group number 0 is used for standing frames. You can check the AIR docs later for recommended numbers for other animation actions. The image number just specifies which image it is within a particular group number. You have to get your own X and Y axis from your sprite. For standing frames, it is usually at the very bottom in the middle of the sprite. For jumping sprites, the axis is usually in the where the character’s feet would be if they were standing. That usually is in the center below the sprite. You can check KFM's sprites by running MUGEN and pressing Ctrl-C while playing. This will bring up the characters' bounding boxes and axes. Here are some examples of axis positions.

The positioning of your axes is very important. If they are slightly off between sprites, you will notice your sprites "jittering" around. If you make bigger errors, your sprites can end up appearing in completely wrong places.

Once you have player.txt ready, go to the directory where you put mugen.exe and sprmaker.exe, etc and make player.sff by typing at the command prompt:

  sprmaker < work\player\player.txt
If you get errors or player.sff wasn’t made, check the text file for errors.


6. I made the .sff. What's next?

Okay, now that you have the standing sprites in player.sff, it's time to animate your character. To make the standing animation, you have to create an action for it (an action is a block of text that describes one sequence of sprites to display). Open up player.air in a text editor, and let's get ready to add a standing animation action. If your player.air is a copy of kfm.air, you can simply edit the appropriate action group (action 0 for standing animation).

It’s time to make player.air. If you've read the AIR docs, you'll know the format for .air is:

Group number, image number, X offset, Y offset, game-ticks, [options]
Don't worry about the lines that start with Clsn2 and Clsn2Default for now.

; Standing Animation
[Begin Action 0]   ;Action 0 is the standing animation
Clsn2Default: 2
 Clsn2[0] = -10,  0, 10,-79
 Clsn2[1] =  -4,-92,  6,-79
0,3, 0,0, 7  
;The above line means to use sprite (0,3) (ie. group 0, image number 3) and 
;display it for 7 game-ticks.  1 game-tick is 1/60 of a sec, so 60 
;ticks is 1 second.  Group 0 Image 3 is stand03.pcx.
0,2, 0,0, 7
0,1, 0,0, 7
0,0, 0,0, 7
0,1, 0,0, 7
0,2, 0,0, 7
;end of file

Now, save this file and you’re ready to see how your character looks!


7. Checking out your actions

If all the files are in the right place, you can directly load your character with MUGEN by typing at the command prompt:

mugen player player

This is a shortcut for versus mode. For now, don't worry if you see warnings at the top of the screen. Warnings are a sign that there's something wrong or missing in your character. In this case, your character might be missing required sprites or animation actions.

If you find a sprite too high up, as if it is floating above the ground, you'll have to move the axis higher up. Just remember that the axis is on ground-level when the character is on the ground. Likewise, if your character is too far forwards, move the axis right. Once you've adjusted the axes for all the sprites correctly, your character shouldn't be sliding or fidgeting around during the animation.

If you accidentally entered a sprite group+image number that doesn't exist, then nothing will be drawn. So if you see your character blinking out, you should go back and check your .air file to see if the numbers correspond to the ones in used for building your .sff.


8. Continuing with Actions and Sprites

After making the standing frames, you can proceed to walking, then jumping. Now that you know the basics of making sprites and actions, you should continue by making the required sprites from spr.txt and required actions from the Reserved Action Numbers in the AIR docs. When you're done, all the warnings at the top of the screen should go away.

In part 2 of the tutorial, you’ll be able to define your character’s bounding boxes so they can get hit and hit other characters. Finally, we’ll show you how to define some attacks in the .cns.


Tutorial 1 | 2 | 3 | 4

Next is Tutorial Part 2

explods.